
| 일 | 월 | 화 | 수 | 목 | 금 | 토 |
|---|---|---|---|---|---|---|
| 1 | ||||||
| 2 | 3 | 4 | 5 | 6 | 7 | 8 |
| 9 | 10 | 11 | 12 | 13 | 14 | 15 |
| 16 | 17 | 18 | 19 | 20 | 21 | 22 |
| 23 | 24 | 25 | 26 | 27 | 28 | 29 |
| 30 | 31 |
- 개인사업자
- Python
- 보정명령
- reactnative
- blockchain
- win32
- elasticSearch
- Tutorial
- 체당금
- 당사자표시정정신청서
- Laravel
- Bootstrap
- Sentinel
- 홈택스
- Java
- javascript
- 이더리움
- 인민공원
- Eclipse
- Blade
- cartalyst
- auth
- 전자소송
- 코로나
- 코로나19
- 소액임금체불
- vue
- 사업자계좌
- php
- as후기
- Today
- Total
그냥 사는 이야기
Vagrant를 사용하여 VirtualBox 제어하기 본문
Vagrant로 VirtualBox 사용
여러대의 vm을 provisioning 할 때 vagrant를 사용할 수 있다. provisioning의 뜻은 위키에
프로비저닝(provisioning)은 사용자의 요구에 맞게 시스템 자원을 할당, 배치, 배포해 두었다가 필요 시 시스템을 즉시 사용할 수 있는 상태로 미리 준비해 두는 것을 말한다. 서버 자원 프로비저닝, OS 프로비저닝, 소프트웨어 프로비저닝, 스토리지 프로비저닝, 계정 프로비저닝 등이 있다. 수동으로 처리하는 '수동 프로비저닝'과 자동화 툴을 이용해 처리하는 '자동 프로비저닝'이 있다.
이렇게 정의 되어 있다.
Vagrant는 VirtualBox뿐만 아니라 Qemu 다른 가상화도 지원하지만 여기서는 윈도우즈 환경에서 무료로 사용할 수 있는 VirtualBox를 다루려고 한다.
VirtualBox, Vagrant 설치
둘 다 공식홈페이지를 가서 현재 호스트(PC 혹은 서버)의 OS에 맞는 버전을 다운 받은 후 설치해주면 된다. 여기서 사용된 프로그램 버전은 아래와 같다.
- VirtualBox : 6.1.4
- Vagrant : 2.7.7 x64
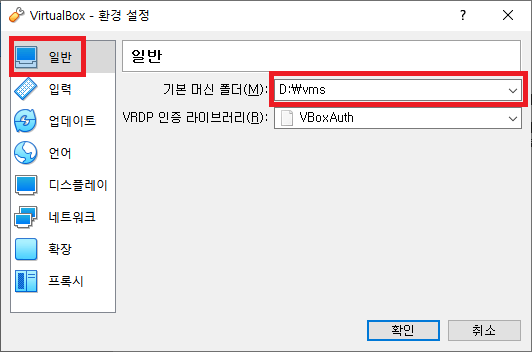
VirtualBox는 설치 후 VM 머신 파일을 위치할 경로를 [환경설정]을 통해 설정해둔다.
Vagrant는 설치 후 reboot을 요구할 텐데 reboot하고 나면 vagrant 명령어의 path가 환경변수에 포함이 될 것이다. 따라서 어떤 경로든지 vagrant 명령어가 사용이 가능해진다.
Virtual Machine Provision
VM 몇대를 이러이러한 사양으로 만들어줘
라고 명령을 하려면 1) 몇대, 2) 사양내역 이 담겨있는 파일이 있어야 한다. 먼저 vagrant 동작에 관련된 정보를 간직할 디렉토리로 이동하여 init을 한다.
d:\vms\testnet>vagrant init
A `Vagrantfile` has been placed in this directory. You are now
ready to `vagrant up` your first virtual environment! Please read
the comments in the Vagrantfile as well as documentation on
`vagrantup.com` for more information on using Vagrant.
init 명령을 실행해주면 Vagrantfile 라는 파일이 생성된다. 이 파일이 레시피 같은 내용을 담고 있으며 주석으로 되어 있는 내용들만 참고해도 어떤식으로 작성해야 할지 감이온다. 아래와 같은 내용대로 구성해준다.
virtualbox_list = {
'vm1' => '10',
'vm2' => '20'
}
Vagrant.configure("2") do |config|
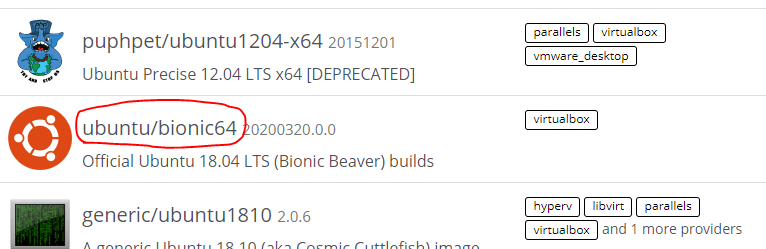
config.vm.box = "ubuntu/bionic64"
virtualbox_list.each do |key, value|
config.vm.define "#{key}" do |vbox|
vbox.vm.network "private_network", ip: "192.168.33.#{value}"
vbox.vm.hostname = "#{key}"
vbox.vm.provider "virtualbox" do |vb|
vb.memory = 2048
end
end
end
endVM은 ubuntu 18.04 머신으로 생성한다. 다른 OS 인스턴스를 만들고 싶으면 미리 만들어져 있는 이미지들을 Vagrant
Cloud에서 찾아서 config.vm.box 에 대입해주면 된다. 그 외에는 "192.168" 로 시작하는 NAT 구성 ip를 설정해주면 되며, VM에 할당할 메모리를 써주면 되는데 위의 예는 2G(2048)를 준 것이다.
Vagrant 파일을 작성하였다면 up을 해주면 여러대의 VM 인스턴스들을 생성 - 부팅 까지 자동으로 시켜준다.
d:\vms\testnet>vagrant up
Bringing machine 'vm1' up with 'virtualbox' provider...
Bringing machine 'vm2' up with 'virtualbox' provider...
==> vm1: Importing base box 'ubuntu/bionic64'...
==> vm1: Matching MAC address for NAT networking...
==> vm1: Checking if box 'ubuntu/bionic64' version '20200320.0.0' is up to date...
==> vm1: Setting the name of the VM: testnet_vm1_1584957364357_50385
==> vm1: Clearing any previously set network interfaces...
==> vm1: Preparing network interfaces based on configuration...
    vm1: Adapter 1: nat
    vm1: Adapter 2: hostonly
==> vm1: Forwarding ports...
    vm1: 22 (guest) => 2222 (host) (adapter 1)
==> vm1: Running 'pre-boot' VM customizations...
==> vm1: Booting VM...
==> vm1: Waiting for machine to boot. This may take a few minutes...
    vm1: SSH address: 127.0.0.1:2222
    vm1: SSH username: vagrant
...

...
    vm2: Inserting generated public key within guest...
    vm2: Removing insecure key from the guest if it's present...
    vm2: Key inserted! Disconnecting and reconnecting using new SSH key...
==> vm2: Machine booted and ready!
==> vm2: Checking for guest additions in VM...
    vm2: The guest additions on this VM do not match the installed version of
    vm2: VirtualBox! In most cases this is fine, but in rare cases it can
    vm2: prevent things such as shared folders from working properly. If you see
    vm2: shared folder errors, please make sure the guest additions within the
    vm2: virtual machine match the version of VirtualBox you have installed on
    vm2: your host and reload your VM.
    vm2:
    vm2: Guest Additions Version: 5.2.34
    vm2: VirtualBox Version: 6.1
==> vm2: Setting hostname...
==> vm2: Configuring and enabling network interfaces...
==> vm2: Mounting shared folders...
    vm2: /vagrant => D:/vms/testnet
VM에 접속
이렇게 vagrant로 생성되어진 vm은 user/password가 vagrant/vagrant로 설정되어져 있다. 별도의 command창이나 shell로 vagrant/vagrant로 접속하여도 되고 ssh 명령어로 접속하여도 된다.
$ vagrant ssh vm1
Welcome to Ubuntu 18.04.4 LTS (GNU/Linux 4.15.0-91-generic x86_64)

 * Documentation:  https://help.ubuntu.com
 * Management:     https://landscape.canonical.com
 * Support:        https://ubuntu.com/advantage

  System information as of Mon Mar 23 10:11:57 UTC 2020

  System load:  0.0               Processes:             99
  Usage of /:   10.0% of 9.63GB   Users logged in:       0
  Memory usage: 6%                IP address for enp0s3: 10.0.2.15
  Swap usage:   0%                IP address for enp0s8: 192.168.33.10


0 packages can be updated.
0 updates are security updates.


Last login: Mon Mar 23 10:10:29 2020
그 외 vagrant 명령어
- vagrant up <args> //args에 해당하는 vm 구동
- vagrant halt <args> //args에 해당하는 vm 정지
- vagrant destroy <args> //args에 해당하는 vm 삭제
- vagrant ssh <args> //args에 해당하는 vm 접속
- vagrant ssh-config <args> //args에 해당하는 vm SSH 설정 확인
- vagrant status // vagrant로 관리되는 vm의 상태 확인
위와 같은 명령을 사용하여 vm 인스턴스들을 제어할 수 있다. 이렇게 놓고 사용해보니 꼭 docker 사용하는 것 같다.
'Development > System' 카테고리의 다른 글
| Windows 10에서 WSL1 사용하기 (2) | 2020.05.06 |
|---|---|
| Linux의 init process 그리고 systemd (0) | 2020.04.28 |
| AMD 라이젠 가상화 활성화 하기 (AMD-V) (6) | 2020.03.12 |
| 윈도우즈 MySQL error 1042: Unable to connect to any of the specified MySQL hosts (0) | 2020.03.09 |
| Putty로 pem파일을 통해 EC2 접속하기 (0) | 2020.01.20 |


